November 23rd, 2003
An overview of the real MPCD reconstruction has been posted in the Technical
area. You can reach it here.
Work is nearly complete on the new front end addition that was required to
support power, network and instructor station connections. It's in the Tech
section as well. You can view it here.
September 20th, 2003
Well today we got quite a bit done. Rob got the 3 24V and 2 5V DC power
supplies installed. I'll post a pic or two of the set up once I have the
power distribution terminals installed.
A long needed accessory has been created! A windscreen shelf:
 This allows us to move the windscreen away from the cockpit without having
to heave that 80lb monster off the floor every time. It's also a LOT easier
on my back. :)
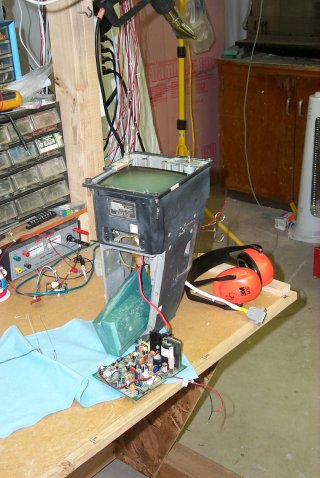
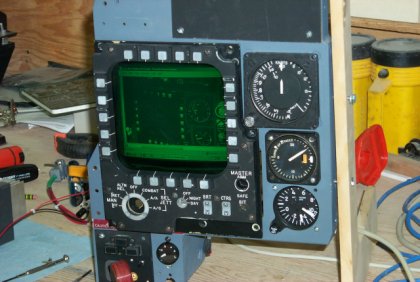
The MPCD refit is finally moving forward after being ignored for so many weeks.
I have the new 7" monochrome VGA display installed and it's just waiting for the
adhesive to cure.
The unfortunate thing here is that I'm forced to use a monochrome display
for the Multi Purpose Color Display. While a 5x5 CRT is easily
obtainable, the price tag for a single unit is $5300.00 and far beyond my
budget. Even LCD displays that are close to the correct size are very costly.
Fortunately, I didn't have to modify the MPCD chassis to make the 7" CRT fit.
This means that I can refit the unit if I ever find a color display for it.
The CRT itself was a very tight fit in the chassis. It was so
tight that to get it in there at all, I had to remove the steel strap that was
placed around the CRT to use as a mounting attachment point. This meant that
I couldn't use it to hold the CRT in place. I used a couple of strategically
placed wood shims to "squeeze" the CRT into place and then fixed that position
with the liberal application of silicone rubber adhesive. This is the same
method that I'd used with success on the VSD rebuild.
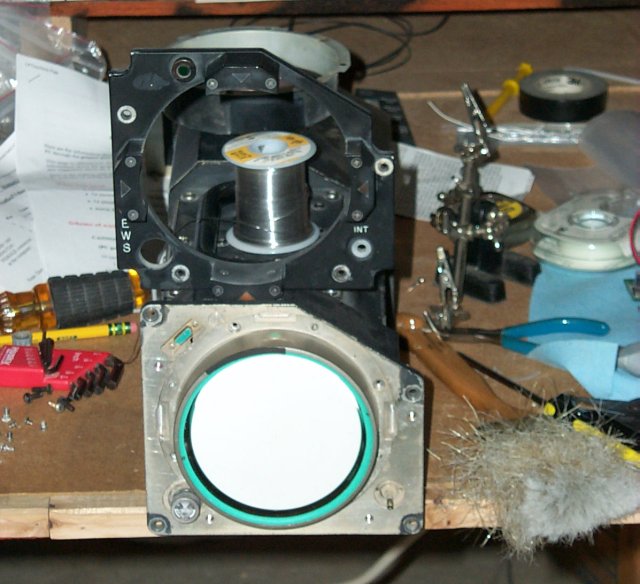
The two green parts you see at the base of the MPCD enclosure are a pair
of the ballast weights that were removed from a compartment in the upper nose
of the fuseleage. They're used in conjunction with other weights to balance
the aircraft at it's center of gravity. They're cast lead bars and weigh
quite a bit. I'd guess 15 to 20lbs each.
This allows us to move the windscreen away from the cockpit without having
to heave that 80lb monster off the floor every time. It's also a LOT easier
on my back. :)
The MPCD refit is finally moving forward after being ignored for so many weeks.
I have the new 7" monochrome VGA display installed and it's just waiting for the
adhesive to cure.
The unfortunate thing here is that I'm forced to use a monochrome display
for the Multi Purpose Color Display. While a 5x5 CRT is easily
obtainable, the price tag for a single unit is $5300.00 and far beyond my
budget. Even LCD displays that are close to the correct size are very costly.
Fortunately, I didn't have to modify the MPCD chassis to make the 7" CRT fit.
This means that I can refit the unit if I ever find a color display for it.
The CRT itself was a very tight fit in the chassis. It was so
tight that to get it in there at all, I had to remove the steel strap that was
placed around the CRT to use as a mounting attachment point. This meant that
I couldn't use it to hold the CRT in place. I used a couple of strategically
placed wood shims to "squeeze" the CRT into place and then fixed that position
with the liberal application of silicone rubber adhesive. This is the same
method that I'd used with success on the VSD rebuild.
The two green parts you see at the base of the MPCD enclosure are a pair
of the ballast weights that were removed from a compartment in the upper nose
of the fuseleage. They're used in conjunction with other weights to balance
the aircraft at it's center of gravity. They're cast lead bars and weigh
quite a bit. I'd guess 15 to 20lbs each.
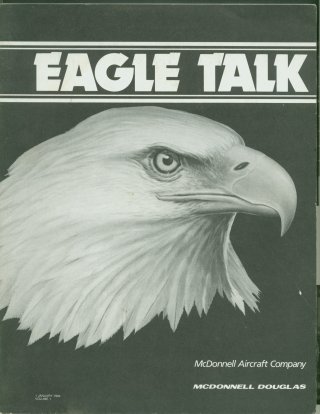 In the process of doing research for this project, I've come across a wonderful
resource. It's a multi-volume set of bound books that contain reprints from
the McDonnell-Douglas Product Support Digest. The volumes are titled Eagle Talk
and they cover all things Eagle. From the initial test flights in 1972 to the
initial prototype F-15E Strike Eagle in the late 1980's, these books cover it.
In the coming weeks I'm going to put information from these online in
preparation for the up coming combat simulation game, Lock-On: Modern Air Combat
where the F-15C is featured alongside the Republic A-10A Warthog.
The idea is to both promote the Lock On game as well as to further in-depth
knowledge about the F-15C Eagle and her systems. I'm sure many of the articles
in Eagle Talk will put to rest quite a few of the arguments that have been going
on in online forums since the Lock On project was announced.
In the process of doing research for this project, I've come across a wonderful
resource. It's a multi-volume set of bound books that contain reprints from
the McDonnell-Douglas Product Support Digest. The volumes are titled Eagle Talk
and they cover all things Eagle. From the initial test flights in 1972 to the
initial prototype F-15E Strike Eagle in the late 1980's, these books cover it.
In the coming weeks I'm going to put information from these online in
preparation for the up coming combat simulation game, Lock-On: Modern Air Combat
where the F-15C is featured alongside the Republic A-10A Warthog.
The idea is to both promote the Lock On game as well as to further in-depth
knowledge about the F-15C Eagle and her systems. I'm sure many of the articles
in Eagle Talk will put to rest quite a few of the arguments that have been going
on in online forums since the Lock On project was announced.
September 17th, 2003
The Boston Globe article appeared today. I posted the following to both the
Simpits-Tech and Digital-Flight mailing lists that I participate on:
Before you hit the link below, I want something understood. Without the
invaluable assistance of my best friend, Rob Hommel, this project would
have _never_ happened. It irritates me to no end that he was not
mentioned specifically in the article, especially after I'd pointed out
repeatedly how valuable an asset he is.
Thanks Rob. :)
Here's the story link:
http://www.boston.com/ae/media/articles/2003/09/17/their_flights_of_fantasy_start_in_real_cockpits/
Thanks also goes out to all the folks that helped me with bits of obscure
information and nearly used up parts. :)
September 16th, 2003
As you can see, there is a new banner at the top of the page. The banner
links to Steve Davies' great F-15E website, The Strike Eagle Roost.
Please check it out, I'm sure you'll be pleased with it. It's probably the
best source of information on the Mud Hen anywhere. Now if I can just get
him to do a book on the C model....
I'm currently looking for copies of Technical Orders 1F-15C-34-1-1 and
1F-15C-34-1-2. I'd love to hear from anyone that can provide these.
E-Mail me at geneb at f15sim.com if you can help me out. Thanks!
September 13th, 2003
Long time no update eh folks? Well Rob and I have been pretty busy with other
persuits. Hopefully things will be back on track quickly.
We spent a lot of time on Saturday prepping the simulator for use. We had
a photographer that was hired by the Boston Globe over to do a shoot for an
upcoming article.
The process of setting up from total scratch to flying is about 3 hours.
The simulator has to be positioned properly, the computer equipment needs to
be hooked up, control interfaces connected, etc. Then the screen and frame assembly has to be uncovered and hung in front of the F-15. Then the LCD panel
and overhead projector have to be set up and configured. Well it seems like
this photographer had been given a deadline and we needed to hurry. We
pulled it off in 44 minutes. We both felt like we'd been run through a grinder
by the time we were done. We had to install the glareshield panels (the old
ones) and then re-install the windscreen. All told it was a hell of a lot of
work.
When we'd finished, everything actually worked the first time. This nearly
surprised us as much as being able to set it all up in record time. The only
hitch that I noticed was the brakes are still sticky. I think I'm going to have to rebuilt them the same way I did for the throttle quadrant. It'll be a
pain in the ass, but when I'm done I won't have to mess with it any longer.
Anyway, Rob had a great time flying around Seattle and Bellevue while the
photographer did her thing. She used a Canon digital camera that had a lens
mount that would be typically found on a regular SLR camera. It was quite the
beast! The pictures she took far outshone the ones that my aging DC-290 can
take and she got good pictures of the screen image - something I've been
unable to do so far.
After she left, we got back to work on the simulator. I managed to get the
basic work done to get the new 7" monochrome VGA screen properly positioned
within the MPCD housing. I'll try to get that completed next week.
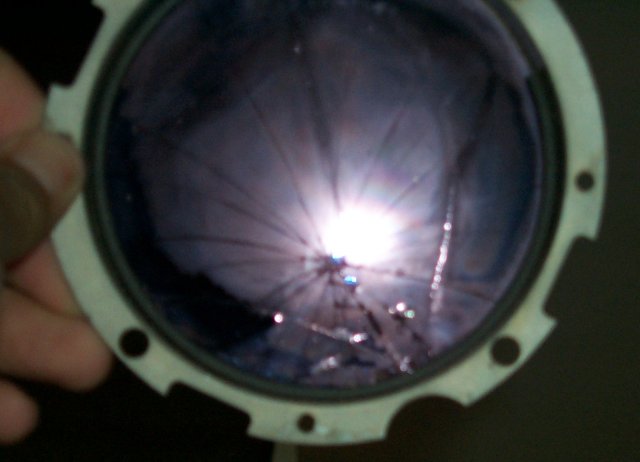
Rob got down to work replacing the shattered combiner lens assembly from the
wrecked HUD I got. We've pretty much written off getting it back to working
condition any time soon. The tooling required to open up the HUD without
damage and the high cost of the custom mirrors are a hinderance right now.
We decided that for the near term, I'd go ahead and display the HUD symbology
on the main screen, positioned and sized so that it would "fit" within the
confines of the HUD combiner glass frame.
Rob went ahead and spent a couple of hours constructing a set of drawings
for the new glass based upon the remains that were still inside the combiner
frame. I asked him to make a set out of 1/4" plywood first just to be able
to sanity-check his drawings before cutting the Lexan that would be used
in the replacement.
Here are some of the salvaged fragments:
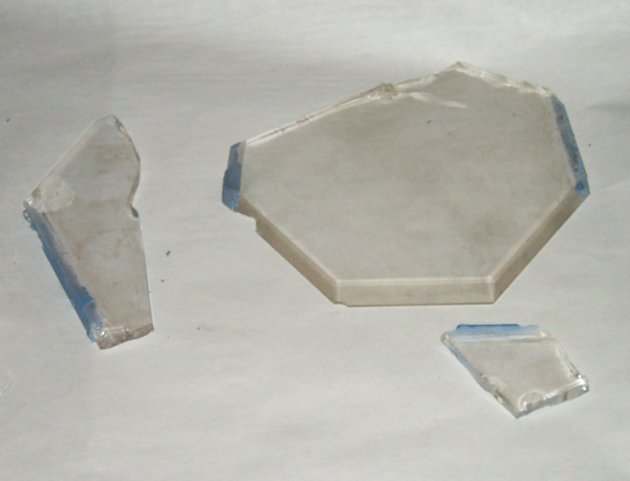 That blue you see along the glass edges is the remains of the adhesive used
to fix the glass to the frame. This is the nastiest, meanest and most flexible
crap I've ever had the displeasure of working with. I eventually had to resort
to using a modelling razor saw to break the upper and lower bonds of this
stuff to the glass and then hammer a wedge into the slot to force the glass
out.
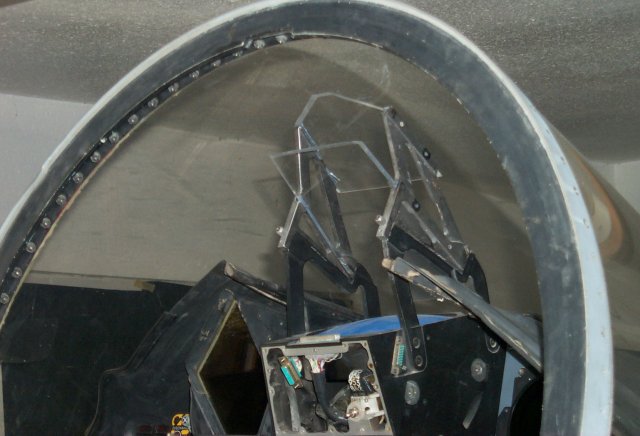
Rob did an _excellent_ job with the new combiner glass sections! Just look
at these shots!
That blue you see along the glass edges is the remains of the adhesive used
to fix the glass to the frame. This is the nastiest, meanest and most flexible
crap I've ever had the displeasure of working with. I eventually had to resort
to using a modelling razor saw to break the upper and lower bonds of this
stuff to the glass and then hammer a wedge into the slot to force the glass
out.
Rob did an _excellent_ job with the new combiner glass sections! Just look
at these shots!
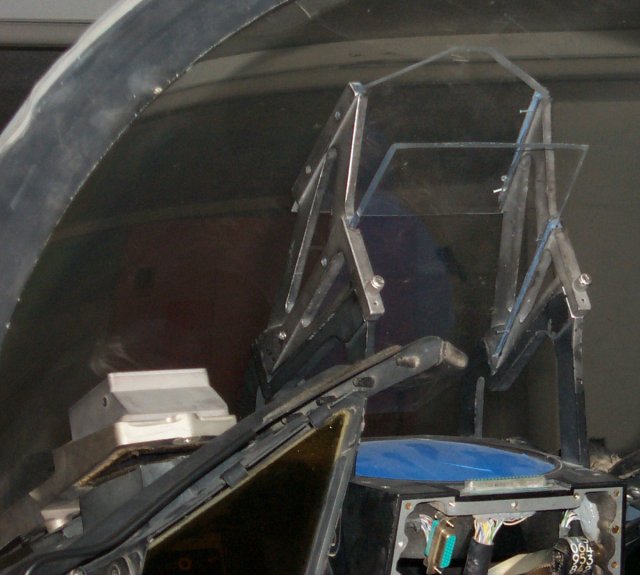
 This is the "before" look:
 Pretty damn impressive, isn't it? Rob used small finishing nails to hold the
Lexan in place while the silicone adhesive dried. They'll be removed.
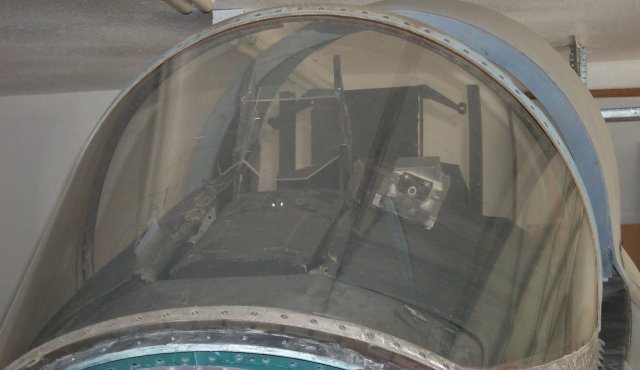
...and here's an outside shot of the new combiner glass assembly:
Pretty damn impressive, isn't it? Rob used small finishing nails to hold the
Lexan in place while the silicone adhesive dried. They'll be removed.
...and here's an outside shot of the new combiner glass assembly:
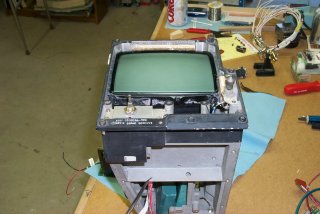
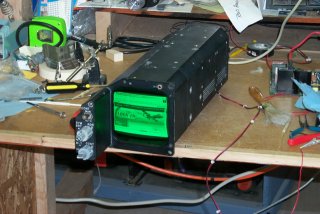
 I also got around to performing the initial teardown on the ALR-56
Countermeasures display I got. This poor thing has certainly seen better days.
The bezel didn't look that bad on the outside, but when I removed it, the
damage was quite apparent:
I also got around to performing the initial teardown on the ALR-56
Countermeasures display I got. This poor thing has certainly seen better days.
The bezel didn't look that bad on the outside, but when I removed it, the
damage was quite apparent:
 I should be able to replace this easily with some of the dark green smoked
lexan I've got in stock.
The display itself is going to present a huge problem. The display is a 4"
*round* CRT. It's the same style that was once used in old oscilloscopes.
My thought is that I may be able to find a refurbished 'scope CRT and with
some helpful electronic magic, be able to drive it from a PC to get the basic
TEWS symbology. Keep your fingers crossed for me.
This is what it looks like:
I should be able to replace this easily with some of the dark green smoked
lexan I've got in stock.
The display itself is going to present a huge problem. The display is a 4"
*round* CRT. It's the same style that was once used in old oscilloscopes.
My thought is that I may be able to find a refurbished 'scope CRT and with
some helpful electronic magic, be able to drive it from a PC to get the basic
TEWS symbology. Keep your fingers crossed for me.
This is what it looks like:
 Until next time! Thanks for stopping by!
August 10th, 2003
The VSD rebuild was completed this weekend - check it out in the Tech
section.
July 28th, 2003
Many thanks to Po for the scan of the color F-15 Flight Simulator patch!
July 12th, 2003
Well folks, I think I've struck the F-15 gold mine for the *second* time.
Through a chance eBay auction, (Hi Dave, Matt!) I discovered an F-15C wreck
sitting under the hot Nevada sun, rotting away. Now normally, this wouldn't
be that big of a deal. There are stripped wrecks all over the place.
However, this wreck was special. The poor girl still had a few parts left.
Very important parts. The Big Four in fact. The MPCD, VSD, HUD and TEWS.
Upon seeing the picture of the cockpit, I understood perfectly why excited
puppies pee on the floor.
You have to understand, I was sitting here in my chair, staring dumbfounded
at the screen. I was looking at a burned out, forgotten wreck of a jet that
represented no less than a years advancement in my project. Hundreds if not
thousands of hours of research and design went *poof* in a single photo.
I then started looking at some of the other photos and it dawned on me that those
little bits of Unobtainum were liberally dusted about this wrecked Eagle.
Little things like the side console flood lights up to the G suit valve and
hose. Sure, it was all abused and busted up, but with a project like this,
broken is preferrable to nothing at all.
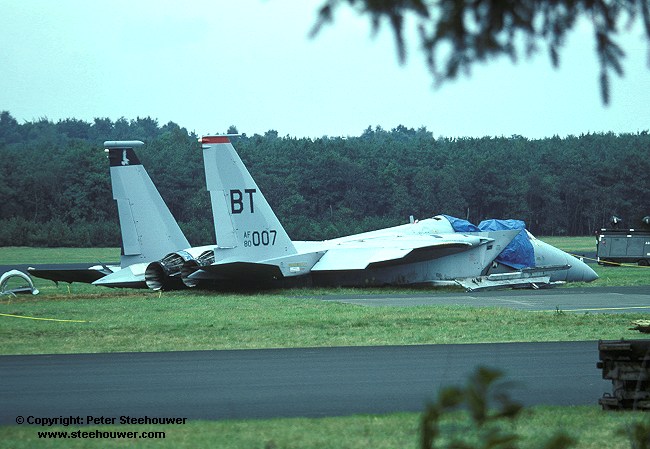
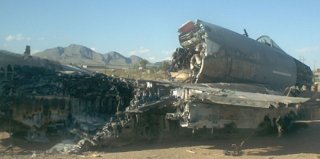 This is how the poor beast looks like on the outside. From what I've been told,
the aircraft suffered a catastrophic engine failure on take-off and the pilot
ejected. The cockpit section broke free of the main fuselage section on impact
and wasn't burned in the after-crash fire. This was my saving grace.
Just guessing by the condition of some of the parts, I would think that the impact
force was probably pretty close to 50Gs if not more. That kind of impact does
pretty serious things to anything made from glass.
The HUD, TEWS and MPCD were obviously wrecked.
The VSD looked ok, but I couldn't tell since the screen is hidden by the VSD camera assembly.
The end result is that I got pretty much anything that wasn't welded into place.
Those parts are still under negotiation. *grin*
By the time Dave was done removing the parts I needed, the poor cockpit looked like
a cow someone had just shoved into a pirhana tank.
When the parts arrived, I made Rob open it all. He knew nothing about the deal
and I figured this would be a perfect late Birthday present for him. Boy was he
suprised! The parts came in 6 boxes totaling 140lbs of 100% Pure Unobtainium.
The first thing I wanted to check was the MPCD and see if there
was any damage. As it turned out, there was a 3 way crack in the CRT face. Otherwise
no other damage was visible. This was good news. The MPCD is destined to be
completely stripped and rebuilt. Since I can't get any 7" color VGA displays, I'll
continue to use the 7" VGA mono that I was using for my original MPCD efforts.
The VSD and TEWS were also in good structural shape.
The VSD doesn't have any cracked glass on the outside. This means that when I gut it to
install a 5" VGA CRT I'll be able to retain the "authentic" look it has. Even if I had
the means to drive the original CRT, it would be pointless. No red hot filament in the
world is going to survive the kind of force applied when the F-15 struck the ground.
The face glass on the TEWS is obviously cracked, but replacement shouldn't be that hard.
I have my doubts about fitting a 5" CRT in there though. It's very small.
The HUD, barring serious intervention is pretty much a write off.
Rob thinks that with some care, it can be repaired enough to allow it to be used again.
The primary reflection mirror was knocked loose on impact and there are at least two edge
chips out of it. I'm going to let Rob baby this one since he's much more knowledgeable in
optics than I am. If the HUD optics are repaired, I'll end up having a special set of
combining glasses made to replace the shattered set that I currently have and I'll use
Project Magenta's Fighter MFD software to generate the HUD symbology (with mods of course).
If the HUD can't be fixed, replacement combining glasses will be made out of 1/4" Lexan and
I'll just display the HUD symbology on the main screen, size corrected so it will "fit" in the
real HUD space.
This is how the poor beast looks like on the outside. From what I've been told,
the aircraft suffered a catastrophic engine failure on take-off and the pilot
ejected. The cockpit section broke free of the main fuselage section on impact
and wasn't burned in the after-crash fire. This was my saving grace.
Just guessing by the condition of some of the parts, I would think that the impact
force was probably pretty close to 50Gs if not more. That kind of impact does
pretty serious things to anything made from glass.
The HUD, TEWS and MPCD were obviously wrecked.
The VSD looked ok, but I couldn't tell since the screen is hidden by the VSD camera assembly.
The end result is that I got pretty much anything that wasn't welded into place.
Those parts are still under negotiation. *grin*
By the time Dave was done removing the parts I needed, the poor cockpit looked like
a cow someone had just shoved into a pirhana tank.
When the parts arrived, I made Rob open it all. He knew nothing about the deal
and I figured this would be a perfect late Birthday present for him. Boy was he
suprised! The parts came in 6 boxes totaling 140lbs of 100% Pure Unobtainium.
The first thing I wanted to check was the MPCD and see if there
was any damage. As it turned out, there was a 3 way crack in the CRT face. Otherwise
no other damage was visible. This was good news. The MPCD is destined to be
completely stripped and rebuilt. Since I can't get any 7" color VGA displays, I'll
continue to use the 7" VGA mono that I was using for my original MPCD efforts.
The VSD and TEWS were also in good structural shape.
The VSD doesn't have any cracked glass on the outside. This means that when I gut it to
install a 5" VGA CRT I'll be able to retain the "authentic" look it has. Even if I had
the means to drive the original CRT, it would be pointless. No red hot filament in the
world is going to survive the kind of force applied when the F-15 struck the ground.
The face glass on the TEWS is obviously cracked, but replacement shouldn't be that hard.
I have my doubts about fitting a 5" CRT in there though. It's very small.
The HUD, barring serious intervention is pretty much a write off.
Rob thinks that with some care, it can be repaired enough to allow it to be used again.
The primary reflection mirror was knocked loose on impact and there are at least two edge
chips out of it. I'm going to let Rob baby this one since he's much more knowledgeable in
optics than I am. If the HUD optics are repaired, I'll end up having a special set of
combining glasses made to replace the shattered set that I currently have and I'll use
Project Magenta's Fighter MFD software to generate the HUD symbology (with mods of course).
If the HUD can't be fixed, replacement combining glasses will be made out of 1/4" Lexan and
I'll just display the HUD symbology on the main screen, size corrected so it will "fit" in the
real HUD space.
June 27th, 2003
After perusing the web site statistics for the last three years, it dawned
on me that the counter in the side frame wasn't any where near accurate.
I've adjusted its display based upon what the log analyzer I use told me
about the hit rates.
Thank you all for visiting the site!
May 28th, 2003
I'd like to welcome all the folks arriving here after reading about the project
in the July issue of Air & Space Smithsonian! Thanks for stopping by and please
don't forget to make an entry in the Guestbook!
F L A S H T R A F F I C
Today (May 22nd, 2003) it was confirmed that my F-15C is 80-0007! This aircraft
was lost in a landing accident at Soesterberg AFB, The Netherlands in 1981.
[Update - The aircraft was performing at an airshow, not training.]
[Update II - The accident date was September 12th, 1981]
[Update III - It's been brought to my attention that '007 was a Block 27 F-15C.]
As incredible as it may seem, there are photos of the mishap AS IT HAPPENED.
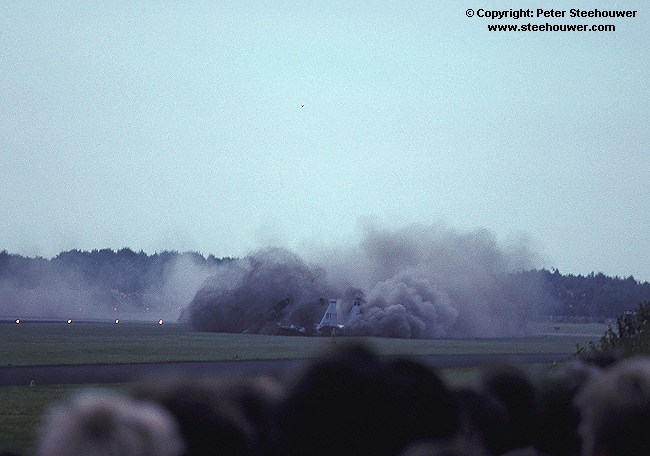
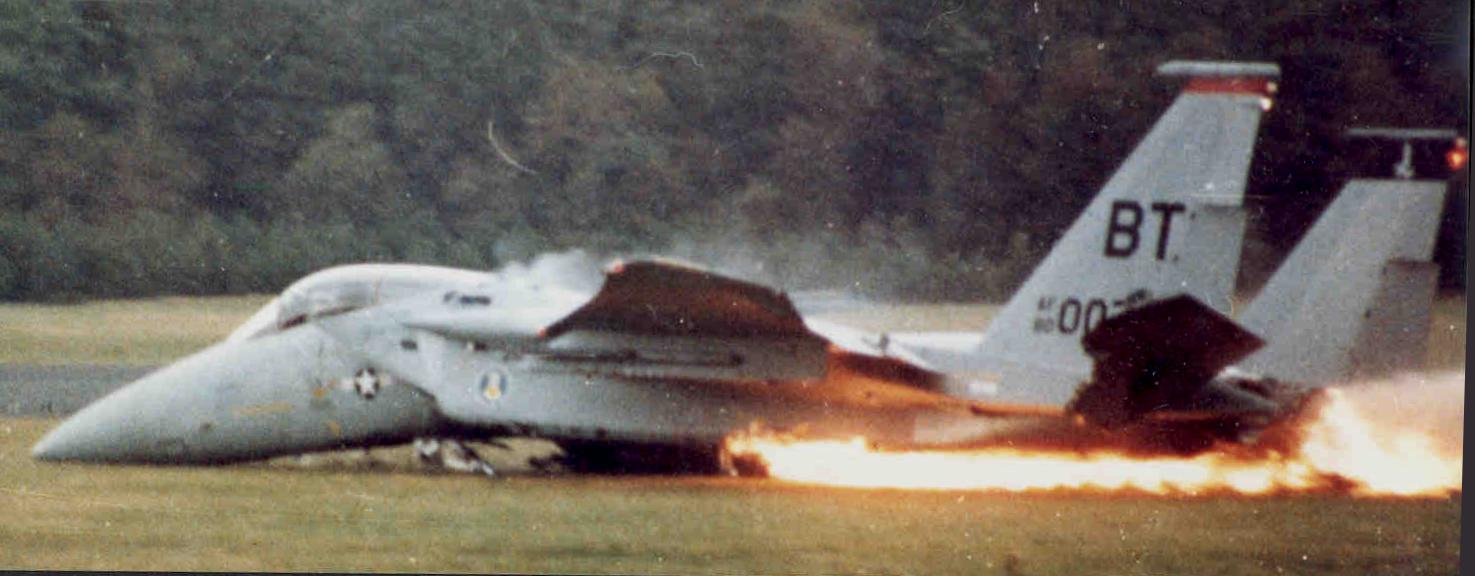
 As soon as I get more information I'll post it to the site. Many thanks to
Peter Steehouwer for allowing me to use his images.
[Update]
As promised, here's a shot of '007 before she was wrecked:
As soon as I get more information I'll post it to the site. Many thanks to
Peter Steehouwer for allowing me to use his images.
[Update]
As promised, here's a shot of '007 before she was wrecked:

May 14th, 2003
On a totaly unrelated subject, I passed my General Class Amateur Radio exam
last night! w00T! :)
My callsign is KC7AFE.
April 23rd, 2003
The Master Caution Panel has been wired up! Check it out in the Tech section!
Many thanks to Peter Cos for the new top banner. Looks cool, eh folks?
April 13th, 2003
A lot has been worked on since my last update! There are three new articles to
check out in the Technical section. The best part is the BIT panel is done!
Well it was done a while ago, but I got lazy about updating the site. :)
Just in case you were wondering, this is what Fred looks like in his finished
state:
 Cool, eh? My friend Rob Hommel did a great job on this.
January 25th, 2003
The new throttle interface has been installed. It worked out surprisingly
well. I knew I should have done it sooner. You can view the article in the Tech
section or by clicking Here.
Tests were completed over the weekend with the new projection screen. Not
everything worked as planned, but we learned a lot. The Tech section
has the details.
Saturday also marked the third fully configured flight test for the
simulator as well as the first test where throttle control was available!
The new throttle mechanism performed its job flawlessly! The response was
smooth and there were no rough spots in the pushrod travel.
I found that no amount of software adjusting was going to cure the problems
I was having with the toe brake mechanism. I'm going to have to spend some
serious time working with this to get it right. The best I was able to do
was a bit of drag on the left brake and general ineffectiveness when both
brakes were fully applied. This is going to the top of my repairs
punch list. I may reconstruct the control mechanism using the same method I
used for the throttle. We'll see.
For those that are interested in some of the eletronic interfaces behind the
simulator, I put together a brief outline of the Phidget gear that I use.
You can find the article in the Tech section or click Here.
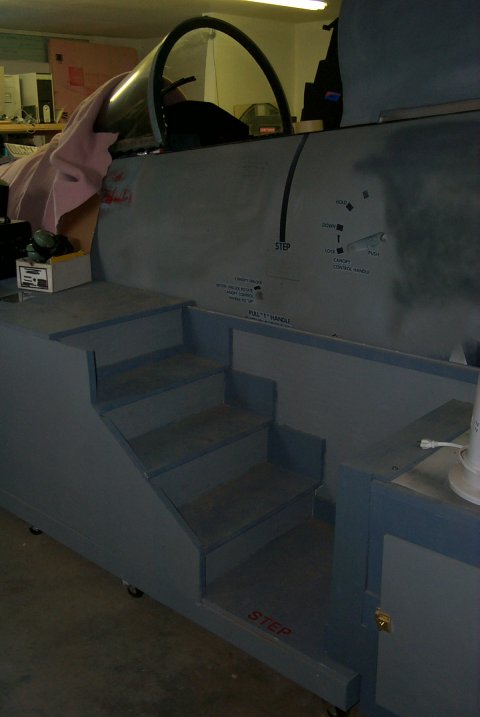
October 27th, 2002
More updates in the general construction area. A new portable stair platform
has been built! Check it out in the Misc section or click here.
October 21st, 2002
The new cradle has been built and installed as well as some screen tests.
Check it out in the Misc section or click here.
September 15th, 2002
The MPCD reconstruction is completed!
 The details of the rebuild can be read in the Tech section.
Many thanks to the fine crew at Ubi Soft for their fine and ongoing work on
the ultimate air combat simulator, Lock On: Modern Air Combat.
The details of the rebuild can be read in the Tech section.
Many thanks to the fine crew at Ubi Soft for their fine and ongoing work on
the ultimate air combat simulator, Lock On: Modern Air Combat.
May 27th, 2002
This is what it's all about. We threw all the parts we had into the cockpit,
working or not and got some pics taken.
 As you can tell, some really cool new parts have shown up, courtesy of Paul
at Desktop Simulators. Without his constant searching for components,
we'd have never nailed down some of this stuff.
Of special note is the MPCD button collar and the landing gear handle.
Great stuff!
As you can tell, some really cool new parts have shown up, courtesy of Paul
at Desktop Simulators. Without his constant searching for components,
we'd have never nailed down some of this stuff.
Of special note is the MPCD button collar and the landing gear handle.
Great stuff!
May 23rd, 2002
Another update to the Technical section. This update
includes details on how the rudder pedals interface to the computer.
Also included is the first part of the new wiring installation.
At the suggestion of one of the frequent visitors to the site, I've added
a Guest Book. Please use it, I'd love to see what
folks think of my crazy little project here. :)
May 22nd, 2002
Updates to the the canopy construction as well as further detail on how
the ILS panel operates (See Misc/ILS Panels).
The Operation link has been made active. It currently covers the MISC,
ILS/TCN, and Engine Control panels. As I construct each panel, I'll be updating
the Operation page with the relevent data for the new panel.
The photos of the new, scratch built engine control panel are available in the
Technical section.
Details of the ejection seat have also been added to the Technical section.
March 27th, 2002
Construction on the new canopy is progressing well. See the "Canopy" link
under the Technical section.
The first of the EPIC modules have been installed! Take a look under
the Technical section for more info.
The first terminal board was also recently built. Check the Technical
section for further details.
January 26th, 2002
Description of new SFS box & flight grip installation.
See Technical -> Stick Force Sensor / Flight Grip
January 13th, 2002
Pictures & notes on the new glareshield half that was built this past Saturday.
A must read if you aspire to be a Professional of Mechanical Improvisation.
August 12th, 2001
Pictures & technical info on the two new panels I got last week. Check
it out in the Technical Section.
July 29th, 2001
The first article in the Technical section has been added!
This first installment covers the rewiring of the throttle quadrant.
March 26th, 2001
The redesign of the website is well on the way to being completed.
I've reworked the text in all of the pages to remove some of the
"gee-whiz" factor. It read poorly and I figured it could only be
improved by a rewrite.
The Restoration, Technical and Operation links are going to be the ones to
watch. The Restoration link will have a gallery of pages that chronicle
the entire transformation of the F-15C from corroding hulk to fully operational
flight simulator. The Technical pages will have details into the systems
of the F-15C and how I'm going to replicate them in the simulator. The
Operation link will be a how-to guide on operating the F-15C throughout its
range of capabilities. From engine start to flight to shutdown, it will be
covered in excruciating detail.
Please check out the Forums link. I've set up a nice forum to host any
questions or suggestions you may have.
April 6, 2001
A new page has been added to the Restoration link. You can find it
here.
A lot of progress has been made in the last two weeks. We've nearly
finished the compartment that will house the overhead projector
and LCD
projection panel. I did a test using the GPL'd simulator Fly8
with good results. We basically wanted to verify that the image wouldn't
be blocked by any of the cockpit structure as well as making sure that the
cut-out area in the forward avionics bays were large enough. Pictures of
the new area will be online shortly.
RetroCam! Soon you'll be able to watch progress on the F-15C
restoration as it happens. I will be installing a color camera in the shop
shortly that will auto-update images on the website every few minutes.
Keep checking back here to see it in action!
For those of you that haven't noticed the forums yet, please check them out
using the link on the left. I'm sure many of you have questions and this
is a great place to ask them!