

I spent quite a while working on getting the air core motors to work properly. The biggest issue was the sound they made due to the PWM signal resonating in the instrument shell. I did get the sound to go away, but at the required frequency the motor would no longer move properly. This lead me to look into other methods I could use that would still fit into a 2″ MS33639 instrument shell.
Many years ago I briefly looked into the micro stepper motors made by Switec. They were fairly new on the scene and were nice, but expensive motors. Fast forward about 12 years and I find that you can obtain these motors for as little as $2.50 each! (lot of 25 on eBay) My search for more information on the motor led me to an Arduino project where the goal was to use these steppers in various projects. The cool thing is that due to the low power consumption of the coils, they could be directly driven from an Arduino without the need for an h-bridge chip! (20mA per coil) The blog entry that I found is here: http://guy.carpenter.id.au/gaugette/2012/01/05/what-is-gaugette/ – I’d recommend you read the rest of his blog – there’s a ton of great information on using Switec motors, including with a Raspberry Pi.
I did a bit more research and found a demonstrator project on Tindie that used a Switec motor – https://www.tindie.com/products/TheRengineer/analog-gauge-stepper-breakout-board. The board allowed for easy connection to an Arduino and included clamping diodes to prevent back-EMF from doing damage to the Arduino. Since the board was way too large for my needs, I re-designed it to use surface mount diodes (LL4148) and reduced the size of the board to match the diameter of a Switec motor.

The 4 pin connector along the bottom is for the two coils in the motor and the 2 pin connector at the top is for the 5v reference voltage for the diodes.
I revised my gauge code to use the Switec X25 library and it works great! The motor I’m using is the X27.168 and has an internal stop. The 2″ gauges in the F-15 don’t require more than 300 degrees of rotation at the most, so this is a perfect choice – it allows me to rotate backwards to hit the stop and then start from a known point. The idea being to use the stop in lieu of a “home” position detector.
Unfortunately, changing to the Switec motor required that I completely re-design the “middle” section of the gauge.
Here’s the result of that redesign:
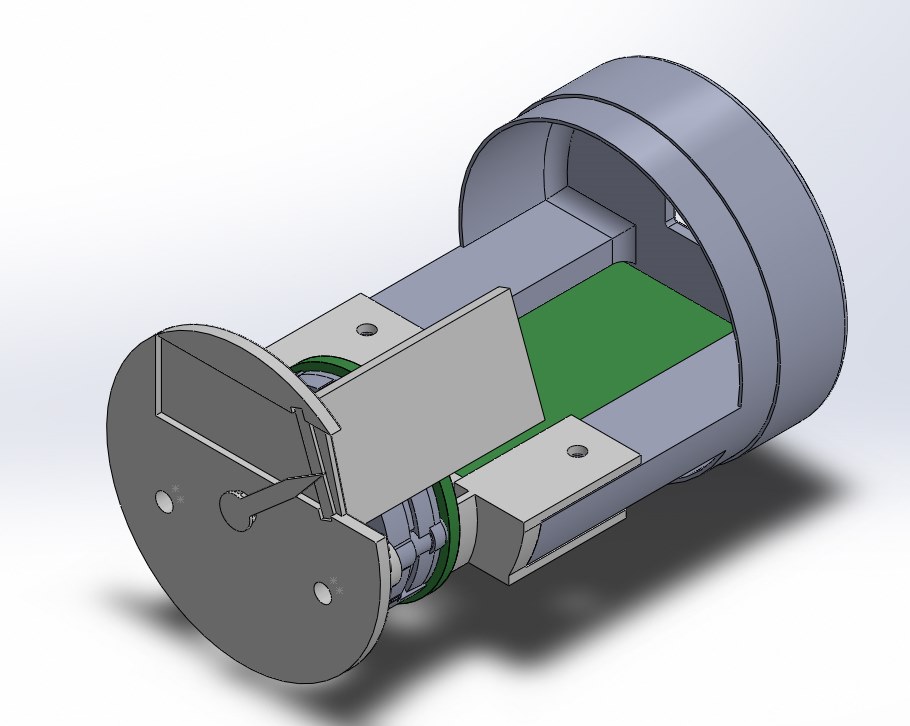
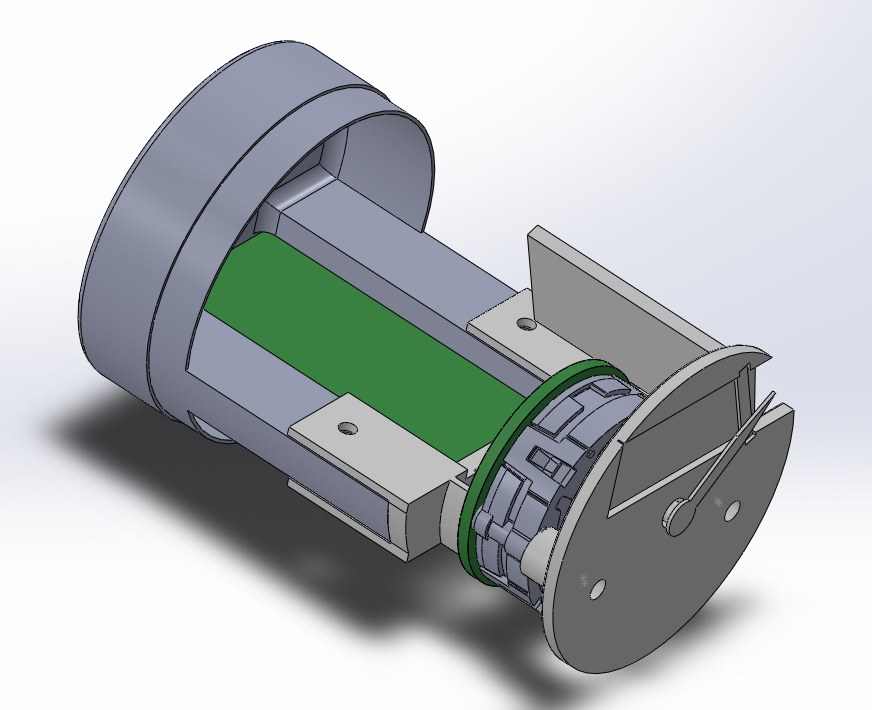
The resulting assembly is going to be roughly 3/4″ shorter than the original, air-core based design. I’m currently printing the new components as I write this. The photo below is the new center mating clip.

This part attaches to the back half of the instrument using two screws. It is connected to the motor and instrument face using a pair of 0-80 screws that pass through the stepper motor and end up in heat-set inserts installed in the standoffs on the instrument face.
I also got the chance to get the finishing touches done on the gauge face graphics. I had them printed up on 120lb card stock at Staples:
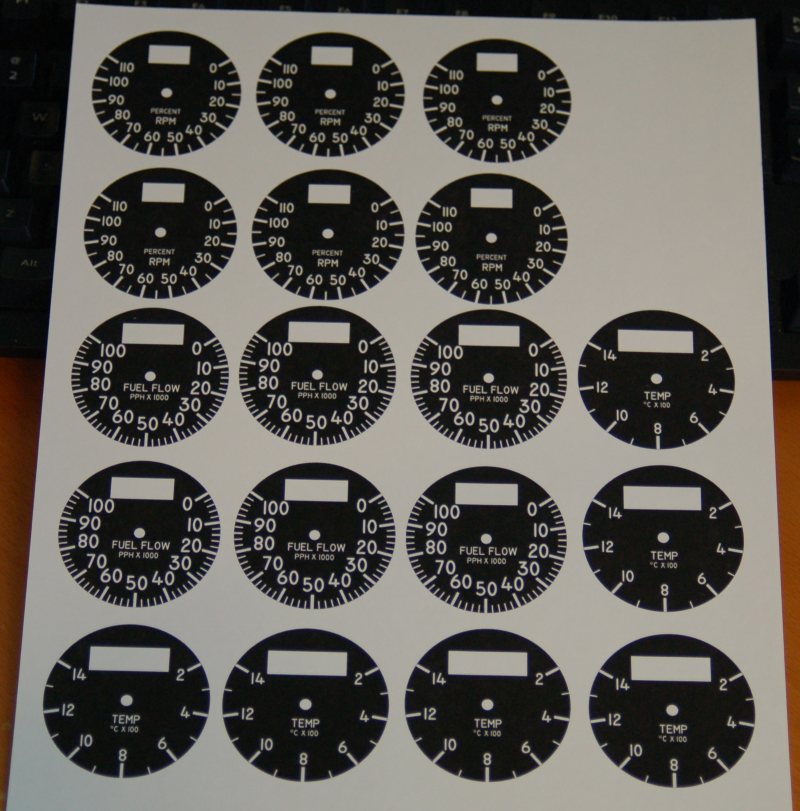 The plan is to cut them out on the laser and then glue them to the gauge faces after assembly. I had enough made to ensure that I’ll have spares when I inevitably screw one up. 🙂 I really like how they turned out!
Thanks for reading!
Comments


Powered by WordPress | Copyright © 2026 F-15C Flight Simulator Project. | All Rights Reserved. | Design by Shea Media
Hyratel on 06.07.2016
I do think you could make and sell these to hobbyists. it’d be great to have accessible, interfacable gauge clusters for model aircraft consoles, simpits, and other things where decent gauges are a high barrier to entry. I don’t know what the rules are for ultralight aircraft discretionary instrumentation are though
admin on 06.08.2016
It’s something I may look into in the future. I need to get the design nailed down first – I’m still waiting for the new interface boards to arrive from Osh Park.
The nice thing about the design is that the same basic core will work with any sized instrument from 2″ up.
One thing I’d really like to do is find a source for the thin wall tubing stock used with real aircraft instruments. That would make them a lot faster to build. 🙂
I’d never sell these for use in any real aircraft, ultralight or otherwise. The liability is just too great.
Alexandre Souza on 02.03.2017
Interesting, have you seen inside the instrument cluster of most cars? At least the velocimeter and tachometer are made using these motors…
admin on 02.15.2017
Yep. The Switec motors have been becoming more and more popular with auto companies.
Phil on 01.10.2018
Given that most of the engine gauges go away when PASS is installed (replaced with the EEMD) maybe a perfect gauge design isn’t as important as it once was. Do you have any plans to update the MIP (PAD, EEMD, VSD-R, FPCD-V, EHSI, etc.) some time in the future or is this purely a restoration effort with no plans to modernize?
admin on 01.11.2018
Phil, the only really good data I have doesn’t cover any of the new upgrades. In order to be able to take advantage of the new hardware, I’d need updated technical orders that covered them – specifically, the -1, -34-1-1 and the -34-1-2. Unfortunately, current copies of those are basically unobtainum.
Matt "Fusion" on 03.05.2018
Hi, your gauge looks great!!! I have some 3d printable stuff on my website falconsims.us community. I was wondering if you would be willing to opensource your gauges project or at least the 3d printable parts both versions? A lot of guys have been looking for something like this. You can join our site which is geared towards BMS and DCS users and builders. We are a new site and still populating. We are 35 members strong. Email me and lets talk! Thanks
Matt “Fusion”
Matt on 03.13.2018
I was wondering if you’d be open to provide model files for your gauge enclosure? Open source? There are some other sim builders out there that would appreciate your help. Please let me know. Check out my website and sign up.
Matt “Fusion”
Email: mg102279@gmail.com